I have been working on a client landing page project for taking bookings for a paid workshop style event. The page contains a contact form 7 form which needs to capture ‘specific booking information’ and then redirect to Paypal to take payment for the workshop once the ‘submit’ button (renamed as pay now) is clicked.
What seemed a straight forward thing to do, was in the end, but only after spending a lot of time ‘googling’ it, accompanied by trial and error! Hence I decided to create this quick post to help other people in the future.
First of all, if you are happy to use plugins, then here are 2 things I tried to do before I found the simple solution, which you DO NOT need to do.
- Spend time trying to get ‘on_sent_ok’ commands to work within the Contact Form 7 Additional Settings box – this method was made obsolete at the end of 2017
- Spend time trying to use a ‘DOM Event’ instead, which requires you to edit your functions.php file
Instead, follow the simple steps below:
Step One – Paypal
Create your paypal button within your paypal account. If you are not sure how to do this, please follow this tutorial provided by Paypal:
https://developer.paypal.com/docs/classic/paypal-payments-standard/integration-guide/buy_now_step_1/
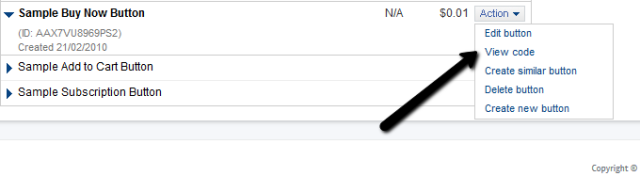
Make a note of your paypal button ID – this can be found by clicking the downward arrow next to ‘Action’.
Step Two – Contact Form 7 Paypal Add-On
Navigate to the Plugins section of your dashboard and ‘Add New’.
Use the search box to find, install and activate ‘Contact Form 7 – PayPal Add-on‘
(Or you can click here & download from wordpress.org directly – this page also has a quick video tutorial, so if you prefer to learn visually, you will find this useful! )
Step Three – Paypal Settings
Go to the ‘Contact Form’ section in the left hand sidebar on your wordpress admin dashboard & select ‘Paypal Settings’
In here:
- Set your language & currency
- Add your Paypal Merchant ID or email address
- Add your sandbox Account details (if you have one – this is used for testing & there is a link within the instructions to show you how you can sign up for one if you haven’t already).
- If you have already built a cancel page or return page – you can add these URLS too, or come back & add them later.
Step Four – Your Contact Form
Create (or edit) your contact form.
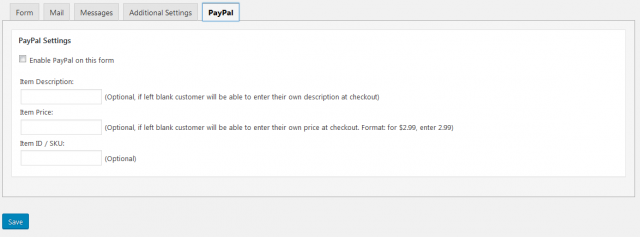
Now you have added the Paypal Plugin, you will see a lovely new tab called ‘Paypal’ when you go in & create or edit your form.
This is where you will need to enter the paypal button ID you made a note of earlier. Each form can have its own paypal settings. Simply fill in the boxes & save!
Step Five – Publish Your Contact Form
Add your contact form to the relevant wordpress page or post and publish.
That’s it, your Contact Form 7 should now be connected to your paypal account and good to go – so go test it’s all working ok.
If you found this tutorial helpful, please drop a comment below, or share for me – thanks !


Leave A Comment
You must be logged in to post a comment.